
Spring Cloud Security 为构建安全的SpringBoot应用提供了一系列解决方案,结合Oauth2可以实现单点登录、令牌中继、令牌交换等功能。
# Spring Cloud Security 和 Oauth2 安全与授权
OAuth 2.0是用于授权的行业标准协议。OAuth 2.0为简化客户端开发提供了特定的授权流,包括Web应用、桌面应用、移动端应用等。
# OAuth2 相关名词解释
- Resource owner(资源拥有者):拥有该资源的最终用户,他有访问资源的账号密码;
- Resource server(资源服务器):拥有受保护资源的服务器,如果请求包含正确的访问令牌,可以访问资源;
- Client(客户端):访问资源的客户端,会使用访问令牌去获取资源服务器的资源,可以是浏览器、移动设备或者服务器;
- Authorization server(认证服务器):用于认证用户的服务器,如果客户端认证通过,发放访问资源服务器的令牌。
# 四种授权模式
- Authorization Code(授权码模式):正宗的OAuth2的授权模式,客户端先将用户导向认证服务器,登录后获取授权码,然后进行授权,最后根据授权码获取访问令牌;
- Implicit(简化模式):和授权码模式相比,取消了获取授权码的过程,直接获取访问令牌;
- Resource Owner Password Credentials(密码模式):客户端直接向用户获取用户名和密码,之后向认证服务器获取访问令牌;
- Client Credentials(客户端模式):客户端直接通过客户端认证(比如client_id和client_secret)从认证服务器获取访问令牌。
# 授权码模式
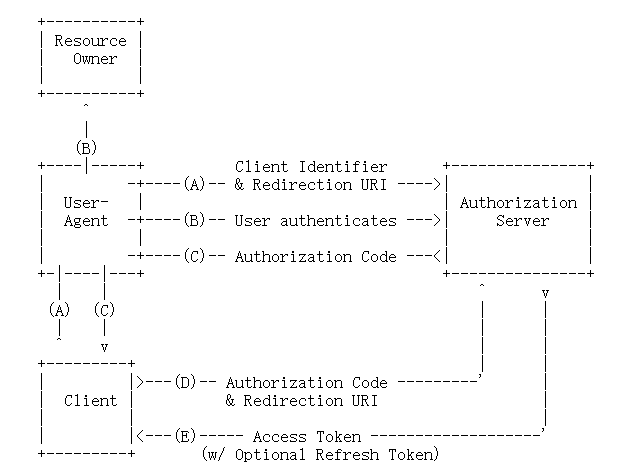
- (A) 客户端将用户导向认证服务器;
- (B) 用户在认证服务器进行登录并授权;
- (C) 认证服务器返回授权码给客户端;
- (D) 客户端通过授权码和跳转地址向认证服务器获取访问令牌;
- (E) 认证服务器发放访问令牌(有需要带上刷新令牌)。
# 密码模式
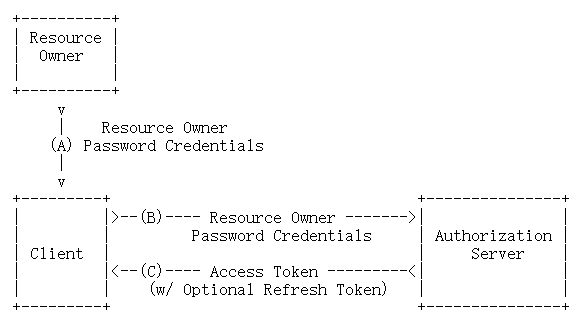
- (A) 客户端从用户获取用户名和密码;
- (B) 客户端通过用户的用户名和密码访问认证服务器;
- (C) 认证服务器返回访问令牌(有需要带上刷新令牌)。
# 创建oauth2-server模块
这里我们创建一个oauth2-server模块作为认证服务器来使用。
在pom.xml中添加相关依赖:
<dependency>
    <groupId>org.springframework.cloud</groupId>
    <artifactId>spring-cloud-starter-oauth2</artifactId>
</dependency>
<dependency>
    <groupId>org.springframework.cloud</groupId>
    <artifactId>spring-cloud-starter-security</artifactId>
</dependency>
<dependency>
    <groupId>org.springframework.boot</groupId>
    <artifactId>spring-boot-starter-web</artifactId>
</dependency>
在application.yml中进行配置:
server:
  port: 9401
spring:
  application:
    name: oauth2-service
添加UserService实现UserDetailsService接口,用于加载用户信息:
@Service
public class UserService implements UserDetailsService {
    private List<User> userList;
    @Autowired
    private PasswordEncoder passwordEncoder;
    @PostConstruct
    public void initData() {
        String password = passwordEncoder.encode("123456");
        userList = new ArrayList<>();
        userList.add(new User("xiaoyu", password, AuthorityUtils.commaSeparatedStringToAuthorityList("admin")));
        userList.add(new User("user1", password, AuthorityUtils.commaSeparatedStringToAuthorityList("client")));
        userList.add(new User("user2", password, AuthorityUtils.commaSeparatedStringToAuthorityList("client")));
    }
    @Override
    public UserDetails loadUserByUsername(String username) throws UsernameNotFoundException {
        List<User> findUserList = userList.stream().filter(user -> user.getUsername().equals(username)).collect(Collectors.toList());
        if (!CollectionUtils.isEmpty(findUserList)) {
            return findUserList.get(0);
        } else {
            throw new UsernameNotFoundException("用户名或密码错误");
        }
    }
}
添加认证服务器配置,使用@EnableAuthorizationServer注解开启:
@Configuration
@EnableAuthorizationServer
public class AuthorizationServerConfig extends AuthorizationServerConfigurerAdapter {
    @Autowired
    private PasswordEncoder passwordEncoder;
    @Autowired
    private AuthenticationManager authenticationManager;
    @Autowired
    private UserService userService;
    /**
     * 使用密码模式需要配置
     */
    @Override
    public void configure(AuthorizationServerEndpointsConfigurer endpoints) {
        endpoints.authenticationManager(authenticationManager)
                .userDetailsService(userService);
    }
    @Override
    public void configure(ClientDetailsServiceConfigurer clients) throws Exception {
        clients.inMemory()
                .withClient("admin")//配置client_id
                .secret(passwordEncoder.encode("admin123456"))//配置client_secret
                .accessTokenValiditySeconds(3600)//配置访问token的有效期
                .refreshTokenValiditySeconds(864000)//配置刷新token的有效期
                .redirectUris("http://www.baidu.com")//配置redirect_uri,用于授权成功后跳转
                .scopes("all")//配置申请的权限范围
                .authorizedGrantTypes("authorization_code","password");//配置grant_type,表示授权类型
    }
}
添加资源服务器配置,使用@EnableResourceServer注解开启:
@Configuration
@EnableResourceServer
public class ResourceServerConfig extends ResourceServerConfigurerAdapter {
    @Override
    public void configure(HttpSecurity http) throws Exception {
        http.authorizeRequests()
                .anyRequest()
                .authenticated()
                .and()
                .requestMatchers()
                .antMatchers("/user/**");//配置需要保护的资源路径
    }
}
添加SpringSecurity配置,允许认证相关路径的访问及表单登录:
@Configuration
@EnableWebSecurity
public class SecurityConfig extends WebSecurityConfigurerAdapter {
    @Bean
    public PasswordEncoder passwordEncoder() {
        return new BCryptPasswordEncoder();
    }
    @Bean
    @Override
    public AuthenticationManager authenticationManagerBean() throws Exception {
        return super.authenticationManagerBean();
    }
    @Override
    public void configure(HttpSecurity http) throws Exception {
        http.csrf()
                .disable()
                .authorizeRequests()
                .antMatchers("/oauth/**", "/login/**", "/logout/**")
                .permitAll()
                .anyRequest()
                .authenticated()
                .and()
                .formLogin()
                .permitAll();
    }
}
添加需要登录的接口用于测试:
@RestController
@RequestMapping("/user")
public class UserController {
    @GetMapping("/getCurrentUser")
    public Object getCurrentUser(Authentication authentication) {
        return authentication.getPrincipal();
    }
}
# 授权码模式使用
- 启动oauth2-server服务;
- 输入账号密码进行登录操作:http://localhost:9401/login
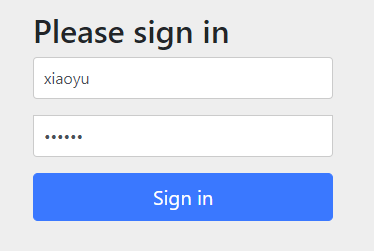
username: xiaoyu
password: 123456
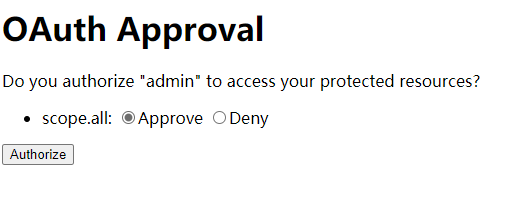
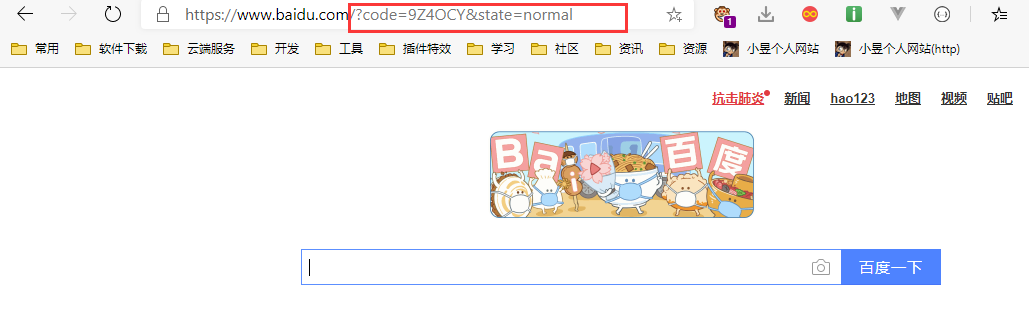
- 选择Approve,点击Authorize,会重定向到指定的redirect_uri,这里是百度,可以看到URL中带着code参数:
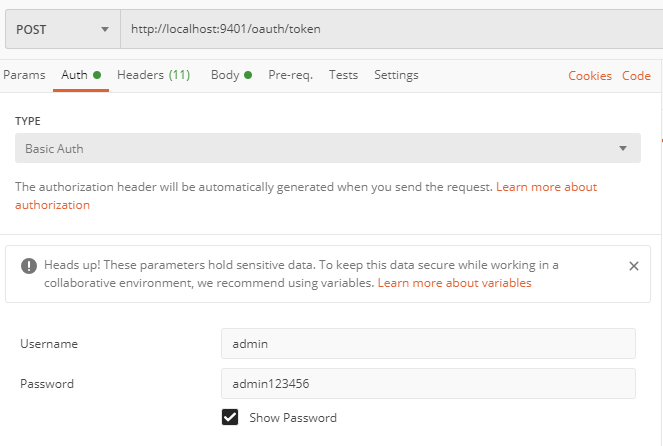
- 在Postman中测试获取授权,使用授权码请求该地址获取访问令牌:http://localhost:9401/oauth/token
在Auth中选择Basic Auth,输入Username和Password分别为admin和admin123456
在Body中传递以下参数:
grant_type: authorization_code
code: 9Z4OCY
client_id: admin
redirect_uri: http://www.baidu.com
scope: all
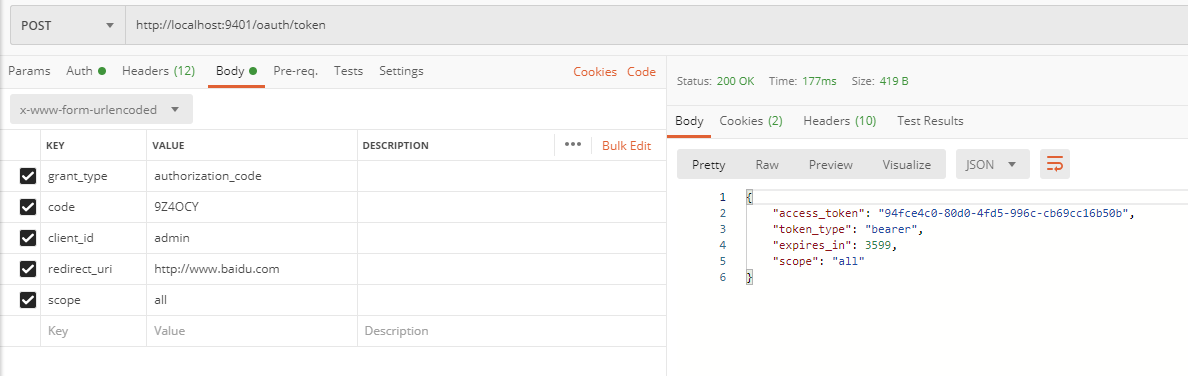
可以在Response Body中看到返回的token:
{
    "access_token": "94fce4c0-80d0-4fd5-996c-cb69cc16b50b",
    "token_type": "bearer",
    "expires_in": 3599,
    "scope": "all"
}
在Headers中传递
Authorization: bearer 94fce4c0-80d0-4fd5-996c-cb69cc16b50b
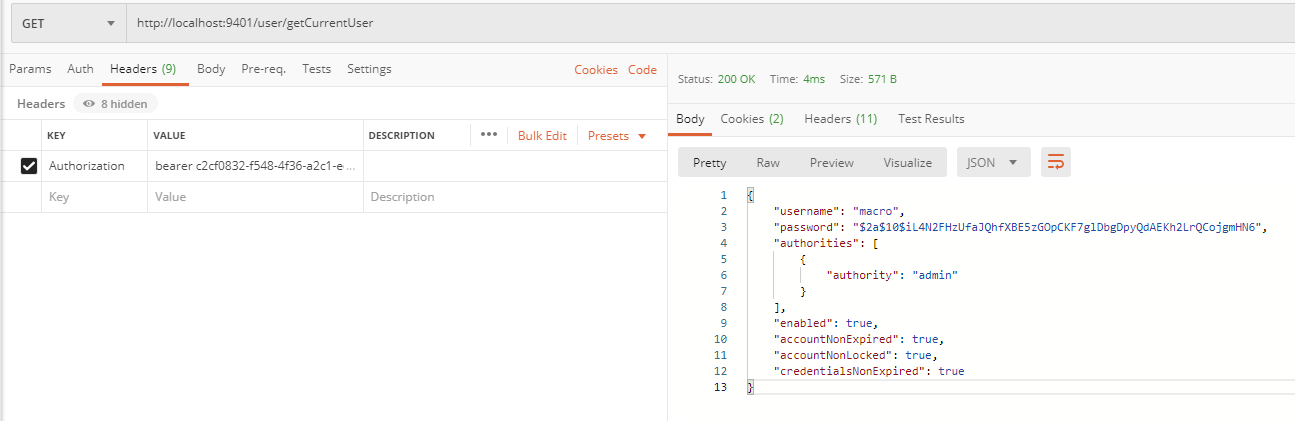
可以看到,返回的数据中携带了用户信息
# 密码模式使用
- 使用密码请求该地址获取访问令牌:http://localhost:9401/oauth/token
- 使用Basic Auth认证,通过client_id和client_secret构造一个Authorization头信息:
- 在body中添加以下参数信息,通过POST请求获取访问令牌:
grant_type: password
username: xiaoyu
password: 123456
scope: all
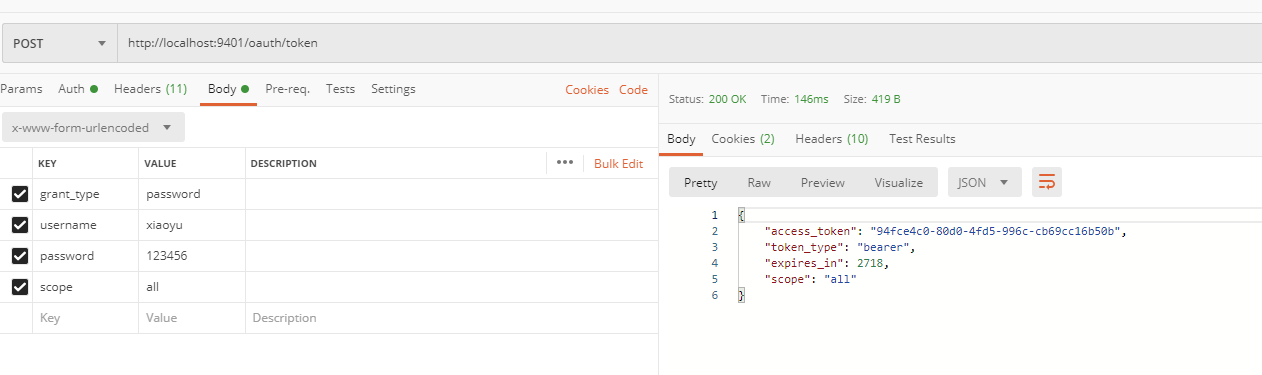
返回token:
{
    "access_token": "94fce4c0-80d0-4fd5-996c-cb69cc16b50b",
    "token_type": "bearer",
    "expires_in": 2718,
    "scope": "all"
}
- 携带token访问接口,跟之前一样携带Authorization头即可:
# 使用Redis存储令牌
在pom.xml中添加Redis相关依赖:
<dependency>
    <groupId>org.springframework.boot</groupId>
    <artifactId>spring-boot-starter-data-redis</artifactId>
</dependency>
在application.yml中添加redis相关配置:
server:
  port: 9401
spring:
  application:
    name: oauth2-service
  redis:
    host: localhost
    port: 6379
添加在Redis中存储令牌的配置:
@Configuration
public class RedisTokenStoreConfig {
    @Autowired
    private RedisConnectionFactory redisConnectionFactory;
    @Bean
    public TokenStore redisTokenStore (){
        return new RedisTokenStore(redisConnectionFactory);
    }
}
在认证服务器配置中指定令牌的存储策略为Redis:
@Configuration
@EnableAuthorizationServer
public class AuthorizationServerConfig extends AuthorizationServerConfigurerAdapter {
    @Autowired
    private PasswordEncoder passwordEncoder;
    @Autowired
    private AuthenticationManager authenticationManager;
    @Autowired
    private UserService userService;
    @Autowired
    @Qualifier("redisTokenStore")
    private TokenStore tokenStore;
    /**
     * 使用密码模式需要配置
     */
    @Override
    public void configure(AuthorizationServerEndpointsConfigurer endpoints) {
        endpoints.authenticationManager(authenticationManager)
                .userDetailsService(userService)
                .tokenStore(tokenStore); // 配置令牌存储策略
    }
    // 省略代码...
}
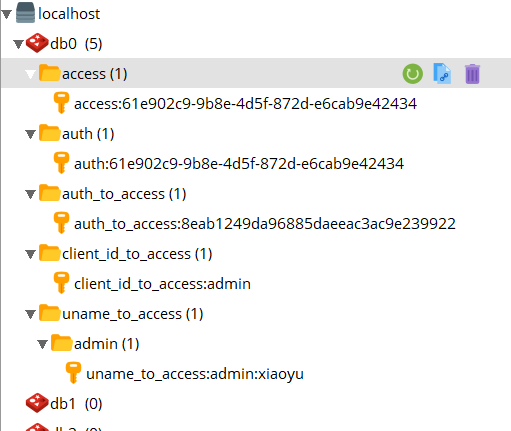
运行项目后使用密码模式来获取令牌,访问如下地址:http://localhost:9401/oauth/token
进行获取令牌操作,可以发现令牌已经被存储到Redis中。
# 使用JWT存储令牌
JWT是JSON WEB TOKEN的缩写,它是基于 RFC 7519 标准定义的一种可以安全传输的的JSON对象,由于使用了数字签名,所以是可信任和安全的。
# JWT的组成
JWT token的格式:header.payload.signature
header中用于存放签名的生成算法;
{
  "alg": "HS256",
  "typ": "JWT"
}
payload中用于存放数据,比如过期时间、用户名、用户所拥有的权限等;
{
  "exp": 1572682831,
  "user_name": "xiaoyu",
  "authorities": [
    "admin"
  ],
  "jti": "c1a0645a-28b5-4468-b4c7-9623131853af",
  "client_id": "admin",
  "scope": [
    "all"
  ]
}
signature为以header和payload生成的签名,一旦header和payload被篡改,验证将失败。
一个典型的JWT长这样:
eyJhbGciOiJIUzI1NiIsInR5cCI6IkpXVCJ9.eyJleHAiOjE1NzI2ODI4MzEsInVzZXJfbmFtZSI6Im1hY3JvIiwiYXV0aG9yaXRpZXMiOlsiYWRtaW4iXSwianRpIjoiYzFhMDY0NWEtMjhiNS00NDY4LWI0YzctOTYyMzEzMTg1M2FmIiwiY2xpZW50X2lkIjoiYWRtaW4iLCJzY29wZSI6WyJhbGwiXX0.x4i6sRN49R6JSjd5hd1Fr2DdEMBsYdC4KB6Uw1huXPg
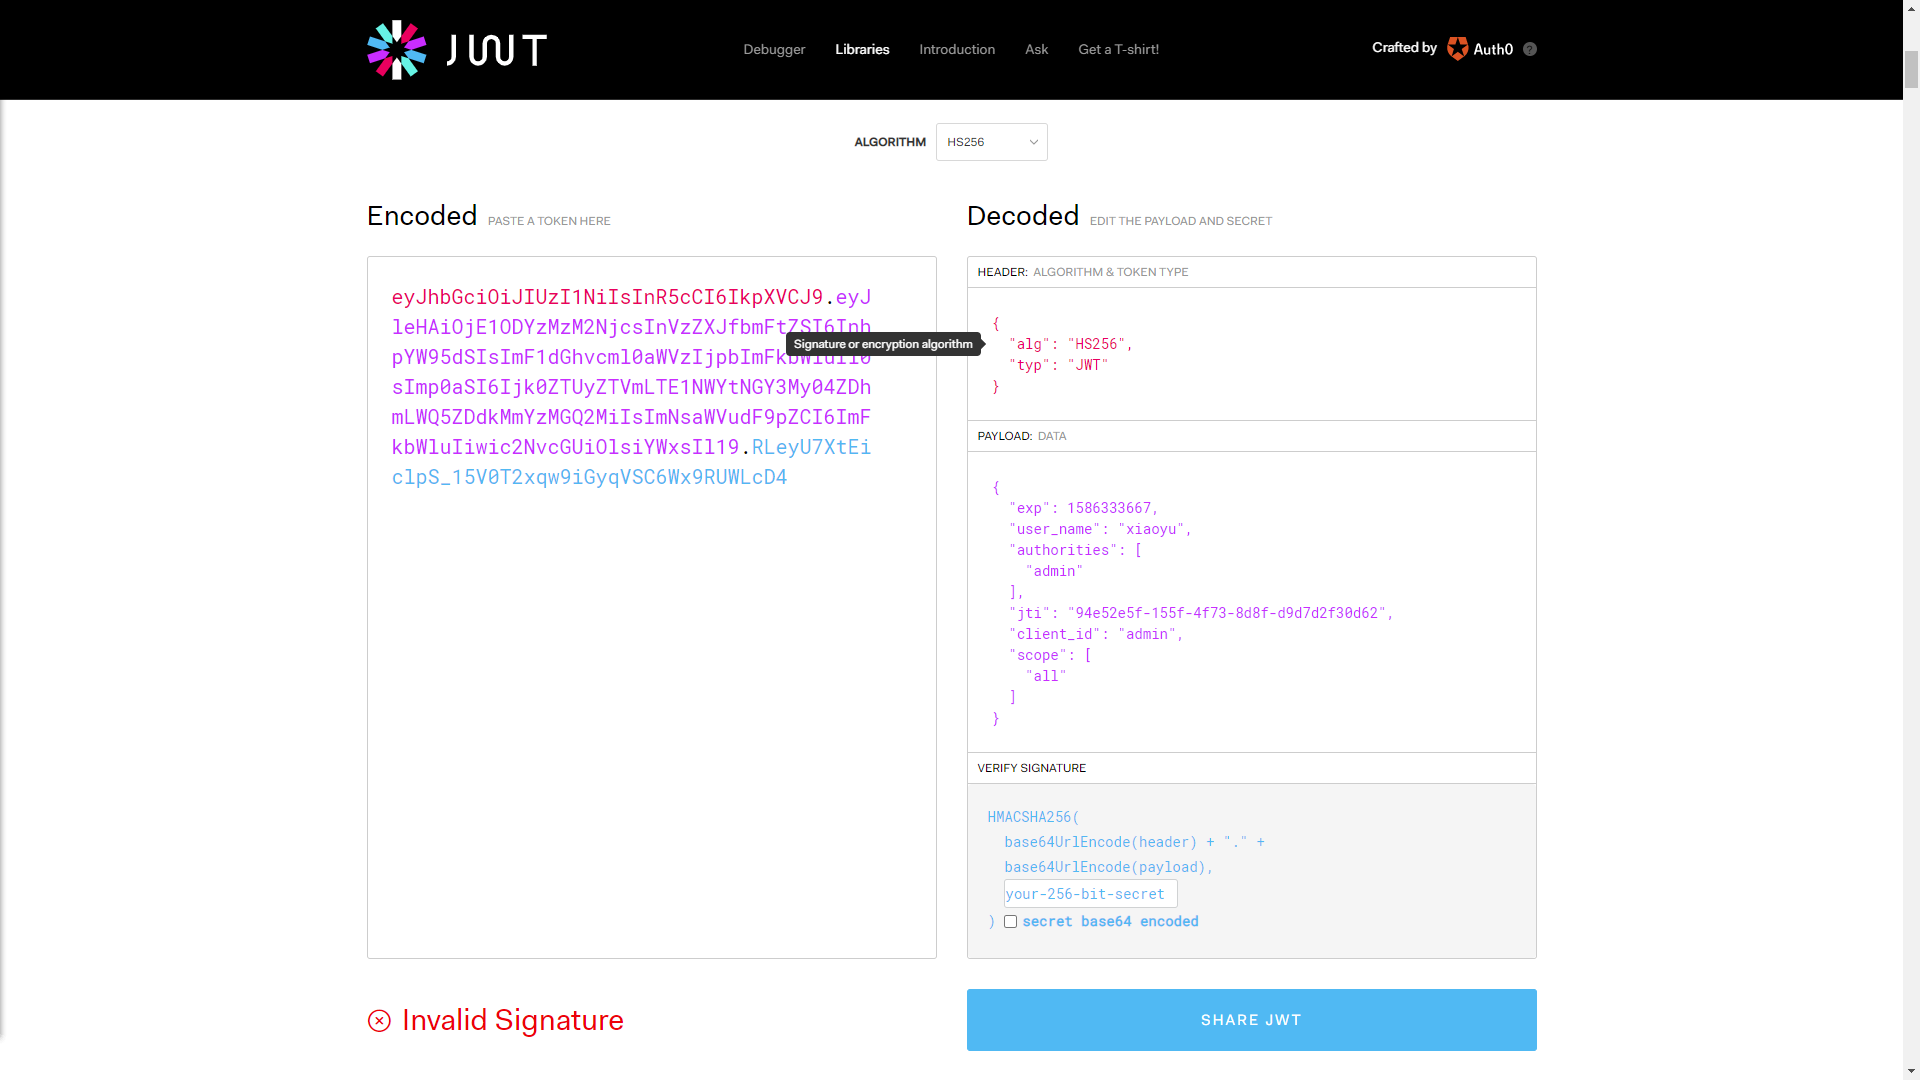
可以在该网站上获得解析结果:https://jwt.io/
# OAuth2结合JWT使用
添加使用JWT存储令牌的配置:
@Configuration
public class JwtTokenStoreConfig {
    @Bean
    public TokenStore jwtTokenStore() {
        return new JwtTokenStore(jwtAccessTokenConverter());
    }
    @Bean
    public JwtAccessTokenConverter jwtAccessTokenConverter() {
        JwtAccessTokenConverter accessTokenConverter = new JwtAccessTokenConverter();
        accessTokenConverter.setSigningKey("test_key");//配置JWT使用的秘钥
        return accessTokenConverter;
    }
}
在认证服务器配置中指定令牌的存储策略为JWT:
@Configuration
@EnableAuthorizationServer
public class AuthorizationServerConfig extends AuthorizationServerConfigurerAdapter {
    @Autowired
    private PasswordEncoder passwordEncoder;
    @Autowired
    private AuthenticationManager authenticationManager;
    @Autowired
    private UserService userService;
    @Autowired
    @Qualifier("jwtTokenStore")
    private TokenStore tokenStore;
    @Autowired
    private JwtAccessTokenConverter jwtAccessTokenConverter;
    /**
     * 使用密码模式需要配置
     */
    @Override
    public void configure(AuthorizationServerEndpointsConfigurer endpoints) {
        endpoints.authenticationManager(authenticationManager)
                .userDetailsService(userService)
                .tokenStore(tokenStore) //配置令牌存储策略
                .accessTokenConverter(jwtAccessTokenConverter);
    }
    //省略代码...
}
提示:RedisTokenStoreConfig和JwtTokenStoreConfig只能存在其中一个配置,否则会报以下错误:
Field tokenStore in org.springframework.security.oauth2.config.annotation.web.configuration.ResourceServerConfiguration required a single bean, but 2 were found:
	- jwtTokenStore: defined by method 'jwtTokenStore' in class path resource [com/example/oauth2server/config/JwtTokenStoreConfig.class]
	- redisTokenStore: defined by method 'redisTokenStore' in class path resource [com/example/oauth2server/config/RedisTokenStoreConfig.class]
运行项目后使用密码模式来获取令牌,访问如下地址:http://localhost:9401/oauth/token
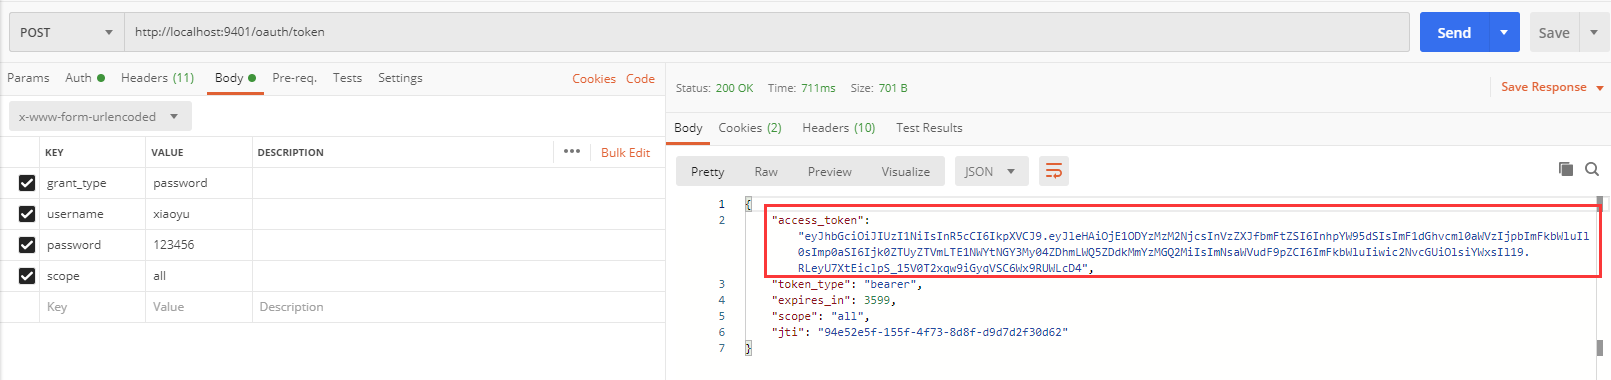
可以看到,已经返回了JWT格式的token了,将其拿到https://jwt.io/解析,结果如下:
# 扩展JWT中存储的内容
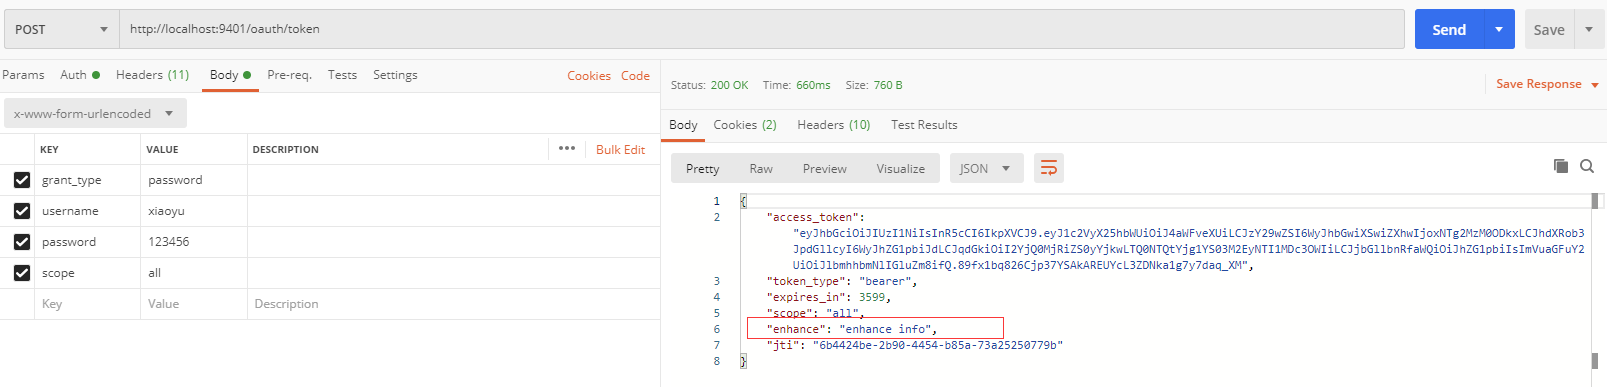
有时候我们需要扩展JWT中存储的内容,这里我们在JWT中扩展一个key为enhance,value为enhance info的数据。
继承TokenEnhancer实现一个JWT内容增强器:
/**
 * Jwt内容增强器
 */
public class JwtTokenEnhancer implements TokenEnhancer {
    @Override
    public OAuth2AccessToken enhance(OAuth2AccessToken accessToken, OAuth2Authentication authentication) {
        Map<String, Object> info = new HashMap<>();
        info.put("enhance", "enhance info");
        ((DefaultOAuth2AccessToken) accessToken).setAdditionalInformation(info);
        return accessToken;
    }
}
在JwtTokenStoreConfig中添加一个JwtTokenEnhancer实例:
/**
 * 使用Jwt存储token的配置
 */
@Configuration
public class JwtTokenStoreConfig {
    //省略代码...
    @Bean
    public JwtTokenEnhancer jwtTokenEnhancer() {
        return new JwtTokenEnhancer();
    }
}
在认证服务器配置中配置JWT的内容增强器:
/**
 * 认证服务器配置
 */
@Configuration
@EnableAuthorizationServer
public class AuthorizationServerConfig extends AuthorizationServerConfigurerAdapter {
    @Autowired
    private PasswordEncoder passwordEncoder;
    @Autowired
    private AuthenticationManager authenticationManager;
    @Autowired
    private UserService userService;
    @Autowired
    @Qualifier("jwtTokenStore")
    private TokenStore tokenStore;
    @Autowired
    private JwtAccessTokenConverter jwtAccessTokenConverter;
    @Autowired
    private JwtTokenEnhancer jwtTokenEnhancer;
    /**
     * 使用密码模式需要配置
     */
    @Override
    public void configure(AuthorizationServerEndpointsConfigurer endpoints) {
        TokenEnhancerChain enhancerChain = new TokenEnhancerChain();
        List<TokenEnhancer> delegates = new ArrayList<>();
        delegates.add(jwtTokenEnhancer); //配置JWT的内容增强器
        delegates.add(jwtAccessTokenConverter);
        enhancerChain.setTokenEnhancers(delegates);
        endpoints.authenticationManager(authenticationManager)
                .userDetailsService(userService)
                .tokenStore(tokenStore) //配置令牌存储策略
                .accessTokenConverter(jwtAccessTokenConverter)
                .tokenEnhancer(enhancerChain);
    }
    //省略代码...
}
运行项目后使用密码模式来获取令牌,发现响应内容中已经包含扩展的内容:
去https://jwt.io/中解析JWT也可以看到多了一个enhance字段:
{
  "user_name": "xiaoyu",
  "scope": [
    "all"
  ],
  "exp": 1586334891,
  "authorities": [
    "admin"
  ],
  "jti": "6b4424be-2b90-4454-b85a-73a25250779b",
  "client_id": "admin",
  "enhance": "enhance info"
}
# 解析JWT中的内容
添加依赖:
<dependency>
    <groupId>io.jsonwebtoken</groupId>
    <artifactId>jjwt</artifactId>
    <version>0.9.0</version>
</dependency>
<dependency>
    <groupId>cn.hutool</groupId>
    <artifactId>hutool-all</artifactId>
    <version>4.6.5</version>
    <scope>compile</scope>
</dependency>
修改控制器:
@RestController
@RequestMapping("/user")
public class UserController {
    @GetMapping("/getCurrentUser")
    public Object getCurrentUser(Authentication authentication, HttpServletRequest request) {
        String header = request.getHeader("Authorization");
        String token = StrUtil.subAfter(header, "bearer ", false);
        return Jwts.parser()
                .setSigningKey("test_key".getBytes(StandardCharsets.UTF_8))
                .parseClaimsJws(token)
                .getBody();
    }
}
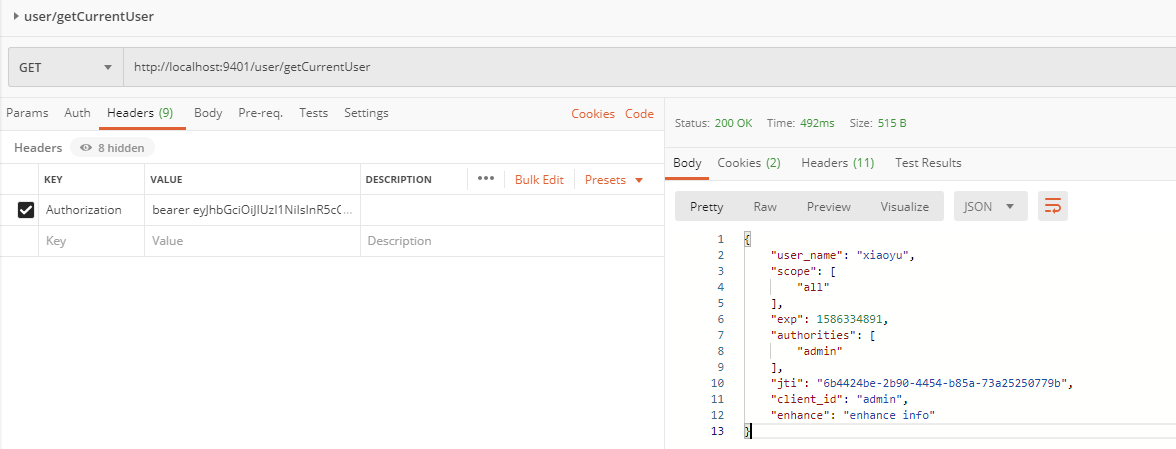
携带token访问http://localhost:9401/user/getCurrentUser可以看到解析后的token:
# 刷新token
在Spring Cloud Security 中使用oauth2时,如果令牌失效了,可以使用刷新令牌通过refresh_token的授权模式再次获取access_token。
只需修改认证服务器的配置,添加refresh_token的授权模式即可。
@Configuration
@EnableAuthorizationServer
public class AuthorizationServerConfig extends AuthorizationServerConfigurerAdapter {
    @Override
    public void configure(ClientDetailsServiceConfigurer clients) throws Exception {
        clients.inMemory()
                .withClient("admin")
                .secret(passwordEncoder.encode("admin123456"))
                .accessTokenValiditySeconds(3600)
                .refreshTokenValiditySeconds(864000)
                .redirectUris("http://www.baidu.com")
                .autoApprove(true) //自动授权配置
                .scopes("all")
                .authorizedGrantTypes("authorization_code","password","refresh_token"); //添加授权模式
    }
}
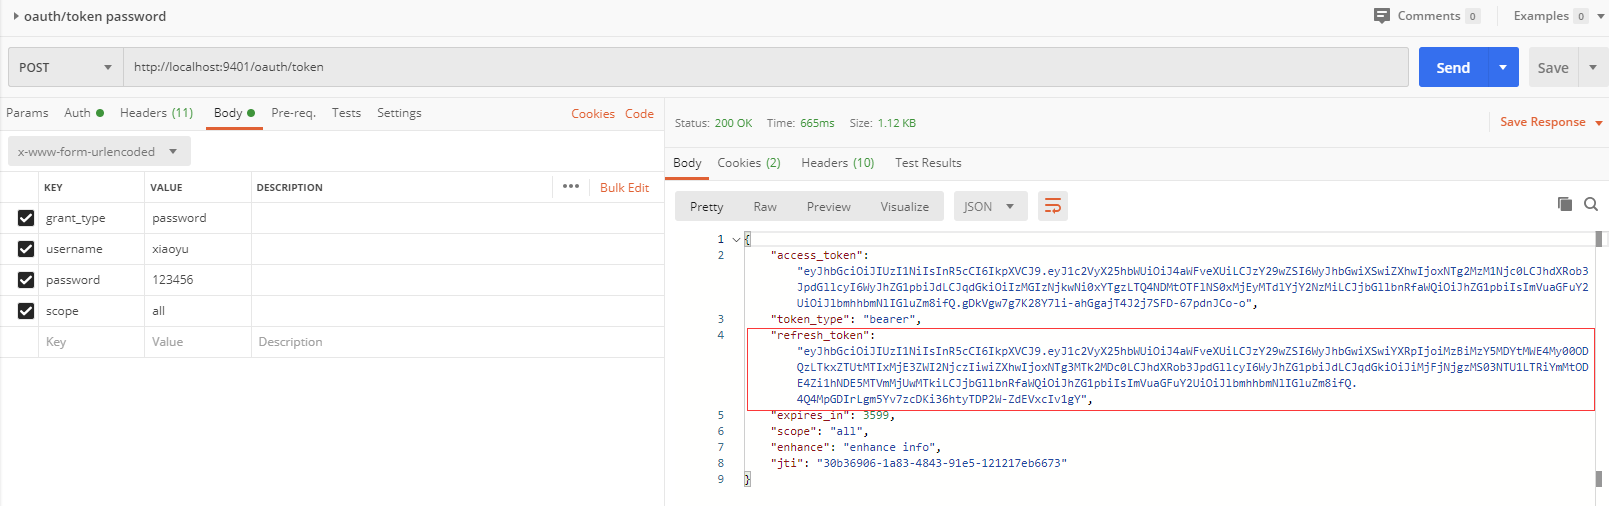
获取token,发现多了一个refresh_token字段:
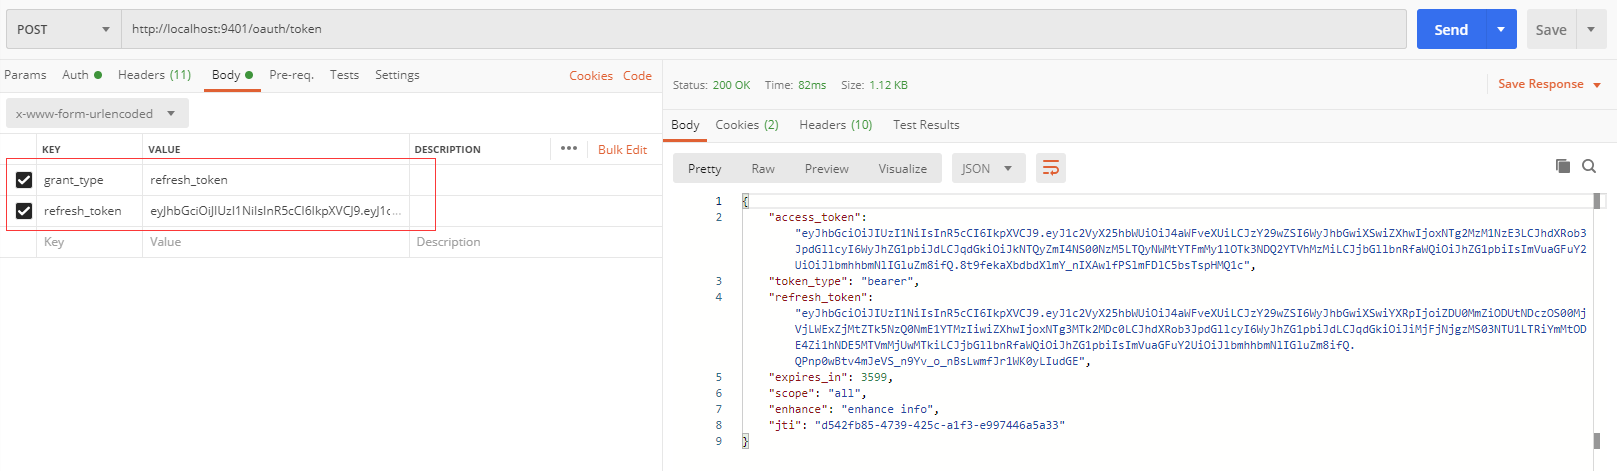
使用刷新令牌模式来获取新的令牌,参数如下:
grant_type: refresh_token
refresh_token: eyJhbGciOiJIUzI1NiIsInR5cCI6IkpXVCJ9.eyJ1c2VyX25hbWUiOiJ4aWFveXUiLCJzY29wZSI6WyJhbGwiXSwiYXRpIjoiMzBiMzY5MDYtMWE4My00ODQzLTkxZTUtMTIxMjE3ZWI2NjczIiwiZXhwIjoxNTg3MTk2MDc0LCJhdXRob3JpdGllcyI6WyJhZG1pbiJdLCJqdGkiOiJiMjFjNjgzMS03NTU1LTRiYmMtODE4Zi1hNDE5MTVmMjUwMTkiLCJjbGllbnRfaWQiOiJhZG1pbiIsImVuaGFuY2UiOiJlbmhhbmNlIGluZm8ifQ.4Q4MpGDIrLgm5Yv7zcDKi36htyTDP2W-ZdEVxcIv1gY
则将返回新的token:
# 单点登录
单点登录(Single Sign On)指的是当有多个系统需要登录时,用户只需登录一个系统,就可以访问其他需要登录的系统而无需登录。
首先创建一个oauth2-client服务作为需要登录的客户端服务,使用前面的oauth2-server作为认证服务,当我们在oauth2-server服务上登录以后,就可以直接访问oauth2-client需要登录的接口。
<dependency>
    <groupId>org.springframework.boot</groupId>
    <artifactId>spring-boot-starter-web</artifactId>
</dependency>
<dependency>
    <groupId>org.springframework.cloud</groupId>
    <artifactId>spring-cloud-starter-oauth2</artifactId>
</dependency>
<dependency>
    <groupId>org.springframework.cloud</groupId>
    <artifactId>spring-cloud-starter-security</artifactId>
</dependency>
<dependency>
    <groupId>io.jsonwebtoken</groupId>
    <artifactId>jjwt</artifactId>
    <version>0.9.0</version>
</dependency>
<dependency>
    <groupId>cn.hutool</groupId>
    <artifactId>hutool-all</artifactId>
    <version>4.6.3</version>
</dependency>
添加配置:
server:
  port: 9501
  servlet:
    session:
      cookie:
        name: OAUTH2-CLIENT-SESSIONID #防止Cookie冲突,冲突会导致登录验证不通过
oauth2-server-url: http://localhost:9401
spring:
  application:
    name: oauth2-client
security:
  oauth2: #与oauth2-server对应的配置
    client:
      client-id: admin
      client-secret: admin123456
      user-authorization-uri: ${oauth2-server-url}/oauth/authorize
      access-token-uri: ${oauth2-server-url}/oauth/token
    resource:
      jwt:
        key-uri: ${oauth2-server-url}/oauth/token_key
在启动类上添加@EnableOAuth2Sso注解来启用单点登录功能:
@EnableOAuth2Sso
@SpringBootApplication
public class Oauth2ClientApplication {
    public static void main(String[] args) {
        SpringApplication.run(Oauth2ClientApplication.class, args);
    }
}
添加接口用于获取当前登录用户信息:
@RestController
@RequestMapping("/user")
public class UserController {
    @GetMapping("/getCurrentUser")
    public Object getCurrentUser(Authentication authentication) {
        return authentication;
    }
}
修改认证服务器配置
修改oauth2-server模块中的AuthorizationServerConfig类,将绑定的跳转路径为http://localhost:9501/login,并添加获取秘钥时的身份认证。
@Configuration
@EnableAuthorizationServer
public class AuthorizationServerConfig extends AuthorizationServerConfigurerAdapter {
    //...
    @Override
    public void configure(ClientDetailsServiceConfigurer clients) throws Exception {
        clients.inMemory()
                .withClient("admin")
                .secret(passwordEncoder.encode("admin123456"))
                .accessTokenValiditySeconds(3600)
                .refreshTokenValiditySeconds(864000)
                .redirectUris("http://localhost:9501/login") //单点登录时配置
                .scopes("all")
                .authorizedGrantTypes("authorization_code","password","refresh_token");
    }
    @Override
    public void configure(AuthorizationServerSecurityConfigurer security) {
        security.tokenKeyAccess("isAuthenticated()"); // 获取密钥需要身份认证,使用单点登录时必须配置
    }
}
# 网页单点登录
启动oauth2-client服务和oauth2-server服务;
访问客户端需要授权的接口http://localhost:9501/user/getCurrentUser会跳转到授权服务的登录界面;
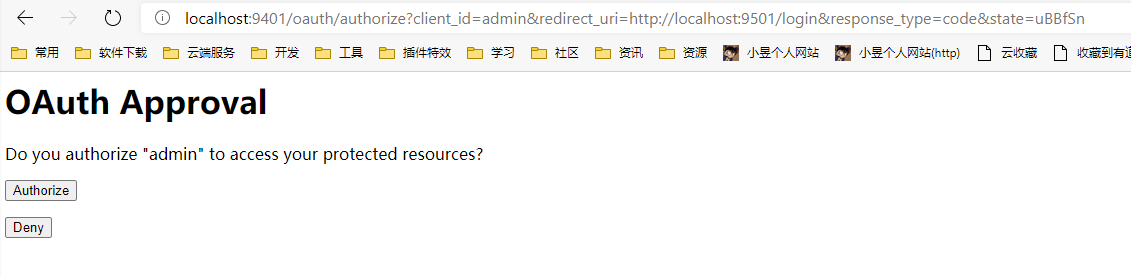
登录后,点击Authorize按钮获取授权:
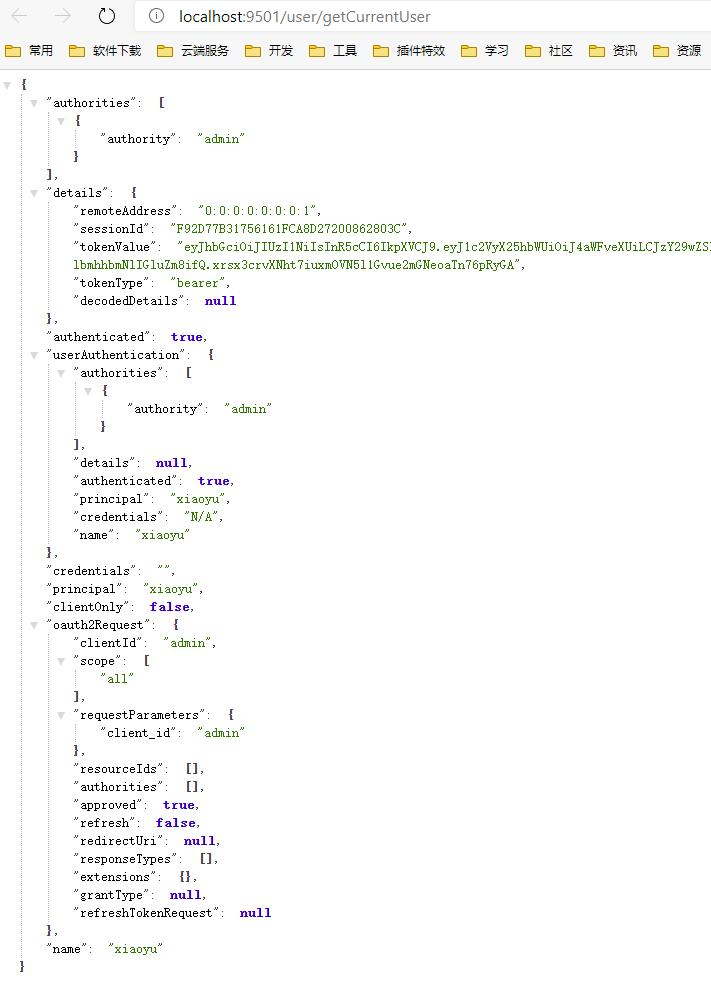
授权后会跳转到原来需要权限的接口地址,展示登录用户信息;
# 自动授权
如果不需要点击Authorize按钮而直接获取授权,可以添加autoApprove(true)配置:
/**
 * 认证服务器配置
 * Created by macro on 2019/9/30.
 */
@Configuration
@EnableAuthorizationServer
public class AuthorizationServerConfig extends AuthorizationServerConfigurerAdapter {
    //...
    @Override
    public void configure(ClientDetailsServiceConfigurer clients) throws Exception {
        clients.inMemory()
                .withClient("admin")
                .secret(passwordEncoder.encode("admin123456"))
                .accessTokenValiditySeconds(3600)
                .refreshTokenValiditySeconds(864000)
                .redirectUris("http://localhost:9501/login") //单点登录时配置
                .autoApprove(true) //自动授权配置
                .scopes("all")
                .authorizedGrantTypes("authorization_code","password","refresh_token");
    }
}
# 接口单点登录
我们使用Postman来演示下如何使用正确的方式调用需要登录的客户端接口。
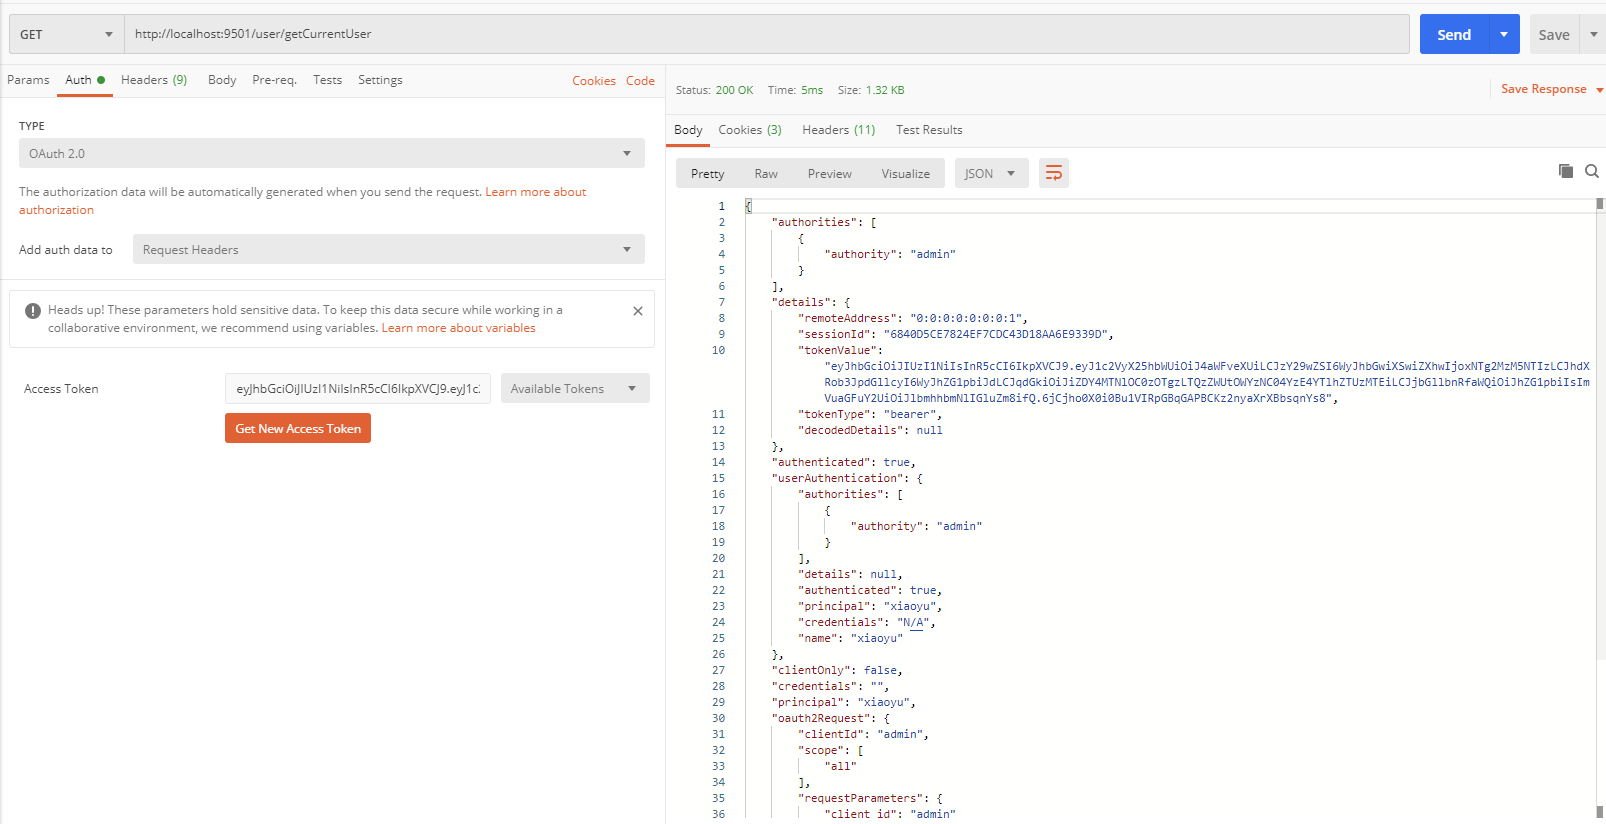
访问客户端需要登录的接口:http://localhost:9501/user/getCurrentUser
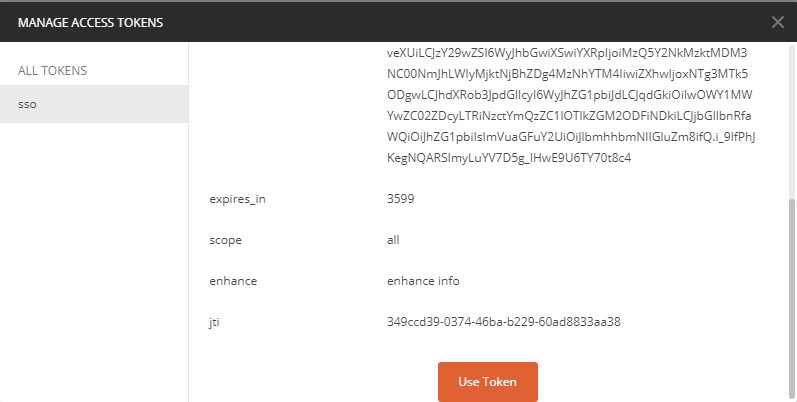
使用Oauth2认证方式获取访问令牌:
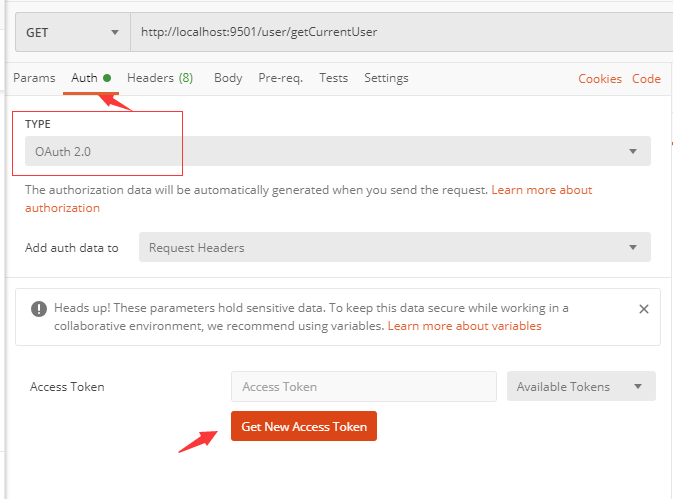
输入获取访问令牌的相关信息,点击请求令牌:
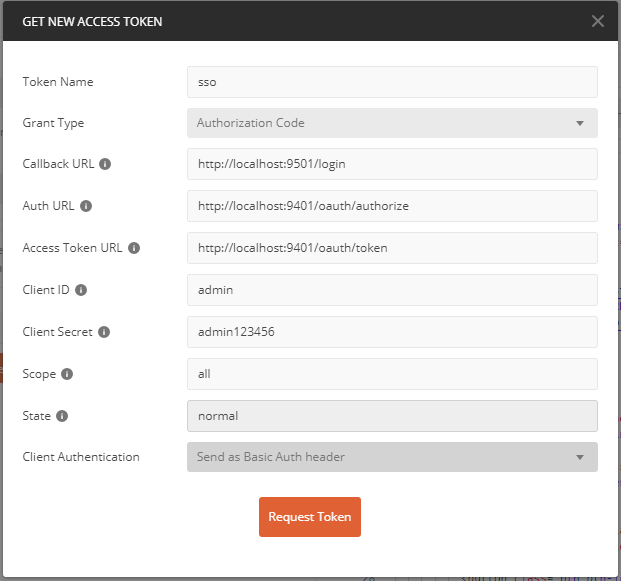
此时会跳转到认证服务器进行登录操作:
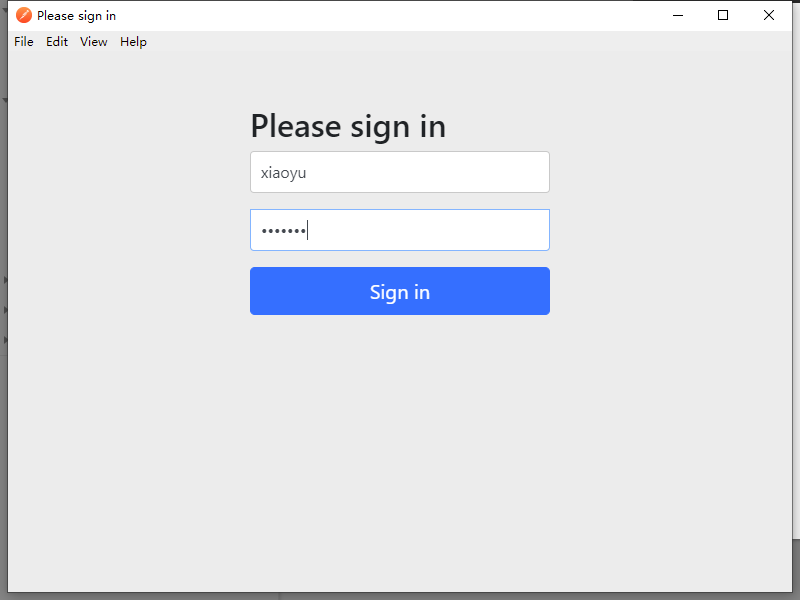
登录成功后使用获取到的令牌:
再次访问http://localhost:9501/user/getCurrentUser,可以看到返回的数据:
可以看到Cookies中存储了JSESSIONID和OAUTH2-CLIENT-SESSIONID:
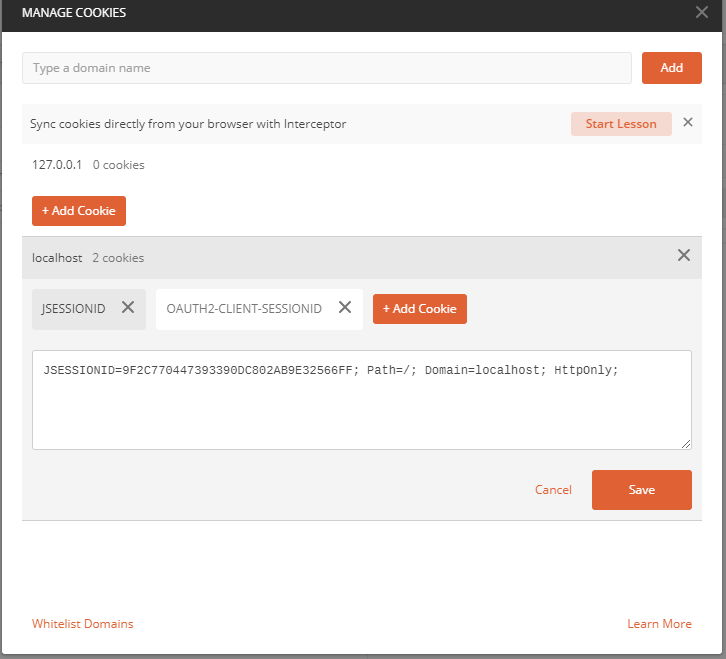
如果清除cookie,则需要重新登录。
# 接口权限校验
添加配置开启基于方法的权限校验:
@Configuration
@EnableGlobalMethodSecurity(prePostEnabled = true)
@Order(101)
public class SecurityConfig extends WebSecurityConfigurerAdapter {
}
在UserController中添加需要admin权限的接口:
@RestController
@RequestMapping("/user")
public class UserController {
    @PreAuthorize("hasAuthority('admin')")
    @GetMapping("/auth/admin")
    public Object adminAuth() {
        return "Has admin auth!";
    }
}
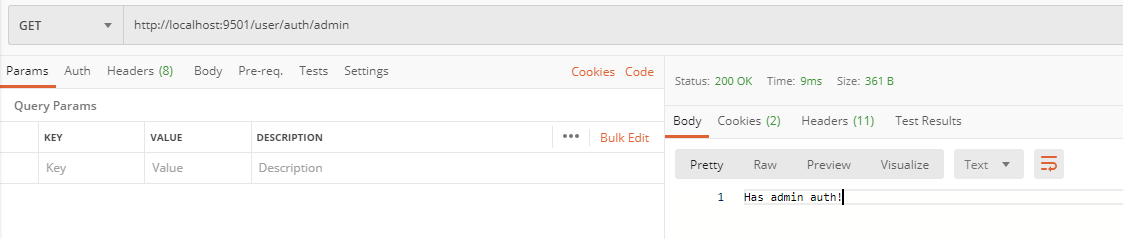
使用有admin权限的用户,比如 xiaoyu:123456 登录,可以正常返回数据:
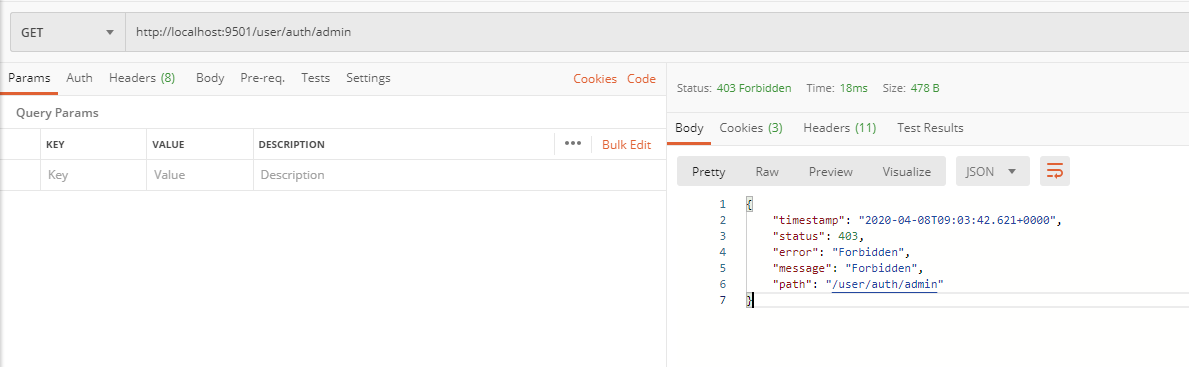
使用没有admin权限的用户,比如 user1:123456 登录,返回403:
# 参考资料
版权声明:著作权归作者所有。商业转载请联系作者获得授权,非商业转载请注明出处。
文章标题:Spring Cloud Security 和 Oauth2 安全与授权
原文链接://www.xiaoyulive.top/categories/java/spring-cloud-security-and-oauth2.html
发表日期:2020-04-08